> ## Documentation Index
> Fetch the complete documentation index at: https://docs.directify.app/llms.txt
> Use this file to discover all available pages before exploring further.
# Connect a Custom Domain to Your Directory
> Connect your own domain to your Directify directory and serve it over HTTPS with an auto-managed SSL certificate — fully branded, zero setup.
Custom domains allow you to use your own domain (e.g., `yourdomain.com`) instead of the default Directify subdomain. Your directory will be served over HTTPS with an automatically managed SSL certificate.
## Step 1: Add Your Domain
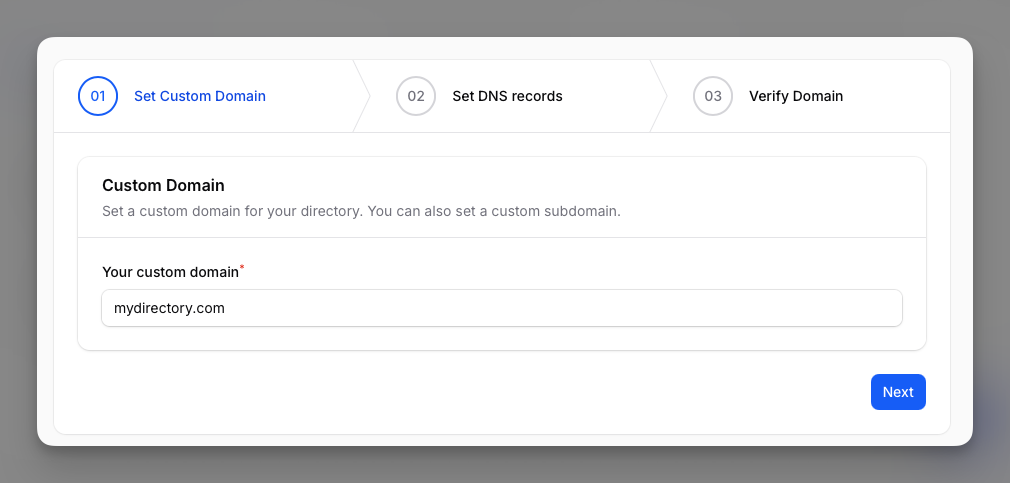
1. Go to your **Directory Settings**
2. Click **Custom Domain** in the sidebar
3. Enter your domain name (e.g., `yourdomain.com` or `www.yourdomain.com`)
4. Click **Next**
 ## Step 2: Choose Setup Method
After entering your domain, you'll see two options for connecting your domain. Choose the method that works best for you.
### Change Nameservers
The easiest and recommended method. Point your domain's nameservers to Directify, and we'll handle all DNS configuration automatically.
**Update your nameservers at your domain registrar to:**
| Nameserver |
| ------------------- |
| `ns1.directify.app` |
| `ns2.directify.app` |
**Why this is recommended:**
* Simplest setup - just change nameservers once
* We manage all DNS records for you automatically
* Automatic configuration for both `www` and non-`www` versions
* No CNAME flattening issues with root domains
**Managing DNS Records:** After switching to Directify nameservers, you can manage your DNS records directly from your directory settings. Go to **Settings** → **Manage DNS Records** to add, edit, or delete records like MX (email), TXT (SPF, DKIM), and more.
### Add CNAME Records
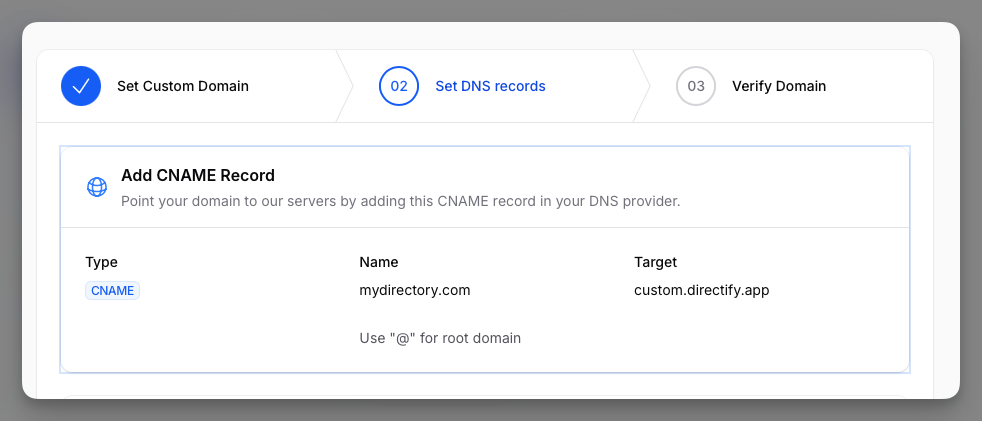
If you prefer to keep your current DNS provider (e.g., you have email or other DNS records to manage), add CNAME records manually.
**For root/apex domains (e.g., `yourdomain.com`)**, you need to add **both** records:
| Type | Name | Target |
| ----- | ----------------------- | ---------------------- |
| CNAME | `@` or `yourdomain.com` | `custom.directify.app` |
| CNAME | `www` | `custom.directify.app` |
**For subdomains (e.g., `directory.yourdomain.com`)**, add only one record:
| Type | Name | Target |
| ----- | ----------- | ---------------------- |
| CNAME | `directory` | `custom.directify.app` |
**For root domains:** Some DNS providers don't support CNAME records on the root domain (`@`). In this case, we recommend using **Option 1 (Nameservers)** instead, or see [Root Domain Limitations](#root-domain-apex-cname-limitations) for other workarounds.
We automatically handle redirects between `www` and non-`www` versions of your domain. That's why both CNAME records are required for apex domains.
## Step 2: Choose Setup Method
After entering your domain, you'll see two options for connecting your domain. Choose the method that works best for you.
### Change Nameservers
The easiest and recommended method. Point your domain's nameservers to Directify, and we'll handle all DNS configuration automatically.
**Update your nameservers at your domain registrar to:**
| Nameserver |
| ------------------- |
| `ns1.directify.app` |
| `ns2.directify.app` |
**Why this is recommended:**
* Simplest setup - just change nameservers once
* We manage all DNS records for you automatically
* Automatic configuration for both `www` and non-`www` versions
* No CNAME flattening issues with root domains
**Managing DNS Records:** After switching to Directify nameservers, you can manage your DNS records directly from your directory settings. Go to **Settings** → **Manage DNS Records** to add, edit, or delete records like MX (email), TXT (SPF, DKIM), and more.
### Add CNAME Records
If you prefer to keep your current DNS provider (e.g., you have email or other DNS records to manage), add CNAME records manually.
**For root/apex domains (e.g., `yourdomain.com`)**, you need to add **both** records:
| Type | Name | Target |
| ----- | ----------------------- | ---------------------- |
| CNAME | `@` or `yourdomain.com` | `custom.directify.app` |
| CNAME | `www` | `custom.directify.app` |
**For subdomains (e.g., `directory.yourdomain.com`)**, add only one record:
| Type | Name | Target |
| ----- | ----------- | ---------------------- |
| CNAME | `directory` | `custom.directify.app` |
**For root domains:** Some DNS providers don't support CNAME records on the root domain (`@`). In this case, we recommend using **Option 1 (Nameservers)** instead, or see [Root Domain Limitations](#root-domain-apex-cname-limitations) for other workarounds.
We automatically handle redirects between `www` and non-`www` versions of your domain. That's why both CNAME records are required for apex domains.
 ## Step 3: Wait for Verification
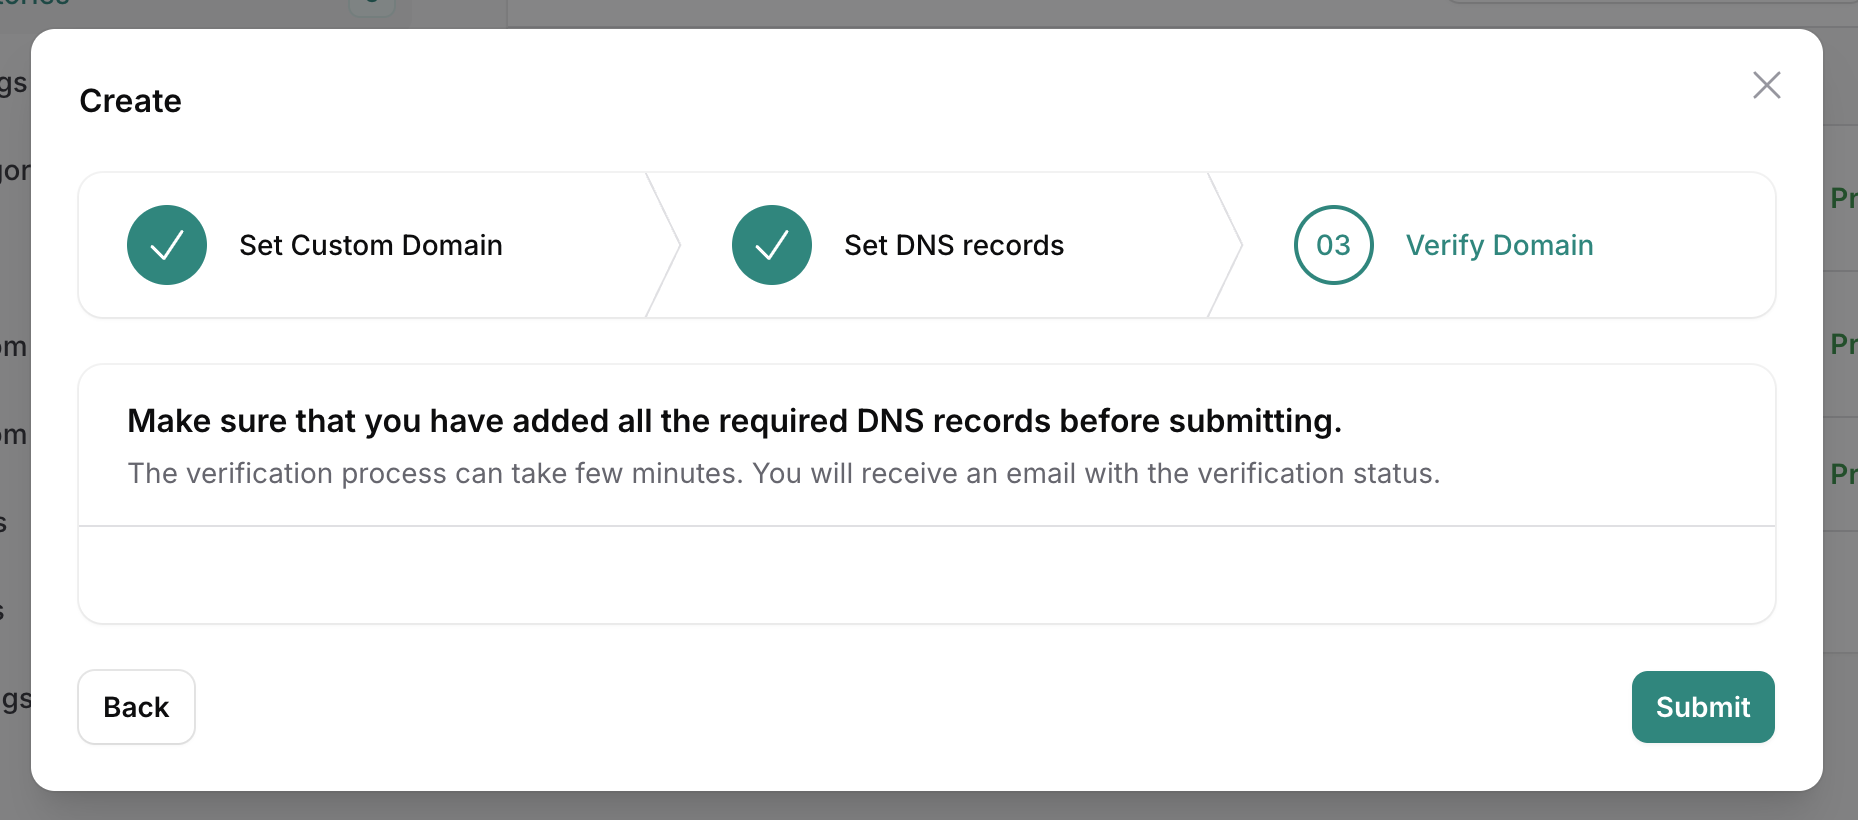
After configuring your DNS (either nameservers or CNAME records), click **Submit** to start the verification process.
DNS propagation typically takes:
* **1-5 minutes** - Cloudflare, AWS Route 53
* **1-4 hours** - Google Domains, Namecheap
* **24-48 hours** - Nameserver changes at some registrars
You'll receive an email notification when your domain is verified and active.
## Step 3: Wait for Verification
After configuring your DNS (either nameservers or CNAME records), click **Submit** to start the verification process.
DNS propagation typically takes:
* **1-5 minutes** - Cloudflare, AWS Route 53
* **1-4 hours** - Google Domains, Namecheap
* **24-48 hours** - Nameserver changes at some registrars
You'll receive an email notification when your domain is verified and active.
 ## Step 4: SSL Certificate
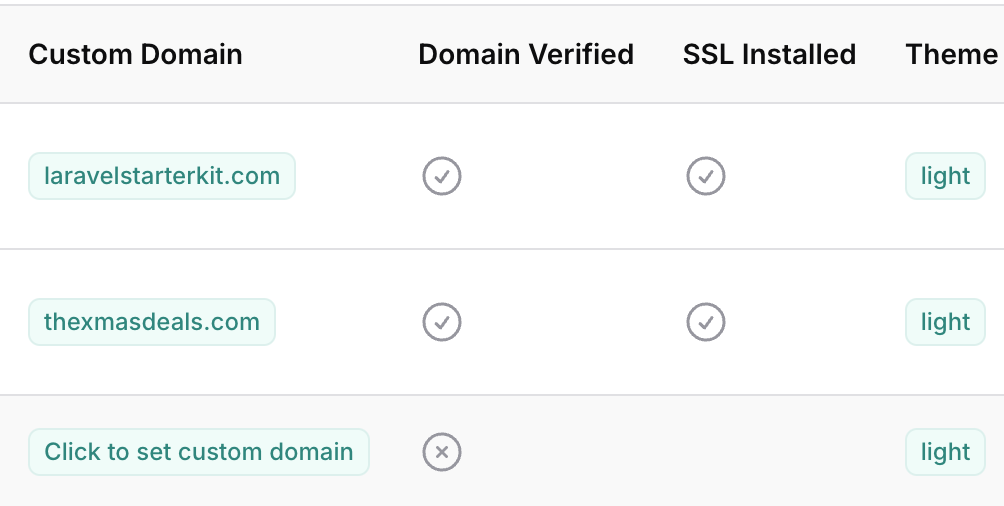
Once DNS is verified, Directify automatically provisions a free SSL certificate. No action required - HTTPS is enabled automatically.
Your directory will be accessible at `https://yourdomain.com` within minutes of DNS verification.
## Step 4: SSL Certificate
Once DNS is verified, Directify automatically provisions a free SSL certificate. No action required - HTTPS is enabled automatically.
Your directory will be accessible at `https://yourdomain.com` within minutes of DNS verification.
 ***
## DNS Provider Examples
### Changing Nameservers
1. Go to **Domain List** → click **Manage** next to your domain
2. Find the **Nameservers** section
3. Select **Custom DNS**
4. Enter:
* `ns1.directify.app`
* `ns2.directify.app`
5. Click the green checkmark to save
1. Go to **My Products** → **Domains**
2. Click on your domain → **DNS** → **Nameservers**
3. Click **Change Nameservers** → **Enter my own nameservers**
4. Enter:
* `ns1.directify.app`
* `ns2.directify.app`
5. Click **Save**
1. Go to **DNS** in the left sidebar
2. Click **Custom name servers**
3. Enter:
* `ns1.directify.app`
* `ns2.directify.app`
4. Click **Save**
1. Go to **Domain Management**
2. Click the dropdown next to your domain → **Edit**
3. Scroll to **Authoritative Nameservers**
4. Enter:
* `ns1.directify.app`
* `ns2.directify.app`
5. Click **Submit**
### Adding CNAME Records
1. Go to your domain's DNS settings
2. Click **Add record**
3. Add the first CNAME record:
* Type: `CNAME`
* Name: `@`
* Target: `custom.directify.app`
* Proxy status: DNS only (gray cloud) or Proxied (orange cloud)
4. Add the second CNAME record:
* Type: `CNAME`
* Name: `www`
* Target: `custom.directify.app`
1. Go to **Domain List** → **Manage** → **Advanced DNS**
2. Click **Add New Record**
3. Add the first CNAME record:
* Type: `CNAME`
* Host: `@`
* Target: `custom.directify.app`
* TTL: Automatic
4. Add the second CNAME record:
* Type: `CNAME`
* Host: `www`
* Target: `custom.directify.app`
Namecheap may not support CNAME on root domain. Use the **Nameservers** method instead, or see workarounds below.
1. Go to **My Products** → **DNS**
2. Click **Add** in the Records section
3. Add the first CNAME record:
* Type: `CNAME`
* Name: `@`
* Value: `custom.directify.app`
* TTL: Default
4. Add the second CNAME record:
* Type: `CNAME`
* Name: `www`
* Value: `custom.directify.app`
GoDaddy may not support CNAME on root domain. Use the **Nameservers** method instead, or see workarounds below.
1. Go to **DNS** in the left sidebar
2. Scroll to **Custom records**
3. Click **Manage custom records**
4. Add both CNAME records as shown in your setup wizard
***
## Troubleshooting
* **Verify DNS records are correct** - Double-check all record types, names, and values
* **Clear local DNS cache** - Run `ipconfig /flushdns` (Windows) or `sudo dscacheutil -flushcache` (Mac)
* **Check propagation status** - Use [whatsmydns.net](https://whatsmydns.net) to verify your records are visible globally
* **Wait longer** - Nameserver changes can take up to 48 hours to propagate
* **Wait up to 1 hour** after DNS verification for SSL to fully activate
* **Verify DNS is correct** - SSL requires your domain to point to `custom.directify.app` (CNAME) or use Directify nameservers
* Verify your DNS settings (nameservers or CNAME records)
* Check for typos in record values
* If using CNAME, ensure **both** root and www records are added
* Ensure you're editing DNS for the correct domain
* Contact support on [Discord](https://discord.gg/B9hTD4kAJY) if issues persist after 24 hours
This domain is already connected to another Directify directory. If you own this domain and need to transfer it, contact support.
Many DNS providers don't support CNAME on root domains. **The easiest solution is to use the Nameservers method** (Option 1). See [Root Domain Limitations](#root-domain-apex-cname-limitations) for more details.
***
## Removing a Custom Domain
1. Go to **Directory Settings** → **Custom Domain**
2. Click **Remove Domain**
3. Confirm the removal
Your directory will revert to using the default Directify subdomain. You can optionally revert your nameservers or remove the DNS records from your domain registrar.
***
## Advanced Configuration
### WWW and Non-WWW Handling
Directify automatically handles both `www.yourdomain.com` and `yourdomain.com`. No matter which version a visitor uses, they'll reach your directory. We recommend:
* **Using Nameservers (Option 1):** Both versions work automatically
* **Using CNAME (Option 2):** Add both the root and `www` CNAME records
### Multiple domains
Currently, each directory supports one custom domain. If you need multiple domains pointing to the same directory, set up redirects at the DNS level to your primary custom domain.
***
## Root Domain (Apex) CNAME Limitations
Some DNS providers don't support CNAME records on root/apex domains (e.g., `yourdomain.com` without any subdomain). This is a technical limitation of the DNS specification, not a Directify limitation.
**Recommended Solution:** Use the **Nameservers method** (Option 1) to avoid this issue entirely. Point your nameservers to `ns1.directify.app` and `ns2.directify.app`, and we handle everything automatically.
### How to check if your provider supports it
Try adding a CNAME record with `@` as the name. If your provider shows an error like "CNAME not allowed on root domain" or "Cannot add CNAME to apex", you'll need to use one of the workarounds below.
### Providers that support root domain CNAME
These providers support CNAME flattening, ANAME, or ALIAS records on root domains:
* **Cloudflare** (free) - Automatic CNAME flattening
* **AWS Route 53** - ALIAS records
* **DNSimple** - ALIAS records
* **DNS Made Easy** - ANAME records
* **NS1** - ALIAS records
* **Netlify DNS** - Automatic handling
* **Vercel DNS** - Automatic handling
### Providers that don't support root domain CNAME
* GoDaddy (basic DNS)
* Namecheap (basic DNS)
* Some traditional registrar DNS services
### Workarounds
The simplest solution. Change your nameservers to Directify's:
| Nameserver |
| ------------------- |
| `ns1.directify.app` |
| `ns2.directify.app` |
We'll handle all DNS configuration automatically, including the root domain issue.
Instead of `yourdomain.com`, use `www.yourdomain.com`:
1. Set up `www.yourdomain.com` as your custom domain in Directify
2. Set up a redirect from your root domain to the www subdomain
**Using your registrar's forwarding feature:**
Most registrars offer URL forwarding. Set up a redirect from `yourdomain.com` to `www.yourdomain.com`.
Cloudflare offers free DNS hosting with automatic CNAME flattening:
1. Create a free account at [cloudflare.com](https://cloudflare.com)
2. Add your domain to Cloudflare
3. Update your domain's nameservers to Cloudflare's (provided during setup)
4. Add your CNAME records in Cloudflare's dashboard
You don't need to transfer your domain - just point the nameservers to Cloudflare. Your domain registration stays with your current registrar.
Some providers offer ALIAS or ANAME records as alternatives to CNAME for root domains. Check your DNS provider's documentation for:
* "ALIAS record"
* "ANAME record"
* "Flattened CNAME"
* "Virtual CNAME"
If available, use the same target (`custom.directify.app`) with an ALIAS/ANAME record type.
***
## Need Help?
Join our Discord for quick support
Email us at [sergey@directify.app](mailto:sergey@directify.app)
***
Learn about free subdomain configuration
Customize your directory design and branding
***
## DNS Provider Examples
### Changing Nameservers
1. Go to **Domain List** → click **Manage** next to your domain
2. Find the **Nameservers** section
3. Select **Custom DNS**
4. Enter:
* `ns1.directify.app`
* `ns2.directify.app`
5. Click the green checkmark to save
1. Go to **My Products** → **Domains**
2. Click on your domain → **DNS** → **Nameservers**
3. Click **Change Nameservers** → **Enter my own nameservers**
4. Enter:
* `ns1.directify.app`
* `ns2.directify.app`
5. Click **Save**
1. Go to **DNS** in the left sidebar
2. Click **Custom name servers**
3. Enter:
* `ns1.directify.app`
* `ns2.directify.app`
4. Click **Save**
1. Go to **Domain Management**
2. Click the dropdown next to your domain → **Edit**
3. Scroll to **Authoritative Nameservers**
4. Enter:
* `ns1.directify.app`
* `ns2.directify.app`
5. Click **Submit**
### Adding CNAME Records
1. Go to your domain's DNS settings
2. Click **Add record**
3. Add the first CNAME record:
* Type: `CNAME`
* Name: `@`
* Target: `custom.directify.app`
* Proxy status: DNS only (gray cloud) or Proxied (orange cloud)
4. Add the second CNAME record:
* Type: `CNAME`
* Name: `www`
* Target: `custom.directify.app`
1. Go to **Domain List** → **Manage** → **Advanced DNS**
2. Click **Add New Record**
3. Add the first CNAME record:
* Type: `CNAME`
* Host: `@`
* Target: `custom.directify.app`
* TTL: Automatic
4. Add the second CNAME record:
* Type: `CNAME`
* Host: `www`
* Target: `custom.directify.app`
Namecheap may not support CNAME on root domain. Use the **Nameservers** method instead, or see workarounds below.
1. Go to **My Products** → **DNS**
2. Click **Add** in the Records section
3. Add the first CNAME record:
* Type: `CNAME`
* Name: `@`
* Value: `custom.directify.app`
* TTL: Default
4. Add the second CNAME record:
* Type: `CNAME`
* Name: `www`
* Value: `custom.directify.app`
GoDaddy may not support CNAME on root domain. Use the **Nameservers** method instead, or see workarounds below.
1. Go to **DNS** in the left sidebar
2. Scroll to **Custom records**
3. Click **Manage custom records**
4. Add both CNAME records as shown in your setup wizard
***
## Troubleshooting
* **Verify DNS records are correct** - Double-check all record types, names, and values
* **Clear local DNS cache** - Run `ipconfig /flushdns` (Windows) or `sudo dscacheutil -flushcache` (Mac)
* **Check propagation status** - Use [whatsmydns.net](https://whatsmydns.net) to verify your records are visible globally
* **Wait longer** - Nameserver changes can take up to 48 hours to propagate
* **Wait up to 1 hour** after DNS verification for SSL to fully activate
* **Verify DNS is correct** - SSL requires your domain to point to `custom.directify.app` (CNAME) or use Directify nameservers
* Verify your DNS settings (nameservers or CNAME records)
* Check for typos in record values
* If using CNAME, ensure **both** root and www records are added
* Ensure you're editing DNS for the correct domain
* Contact support on [Discord](https://discord.gg/B9hTD4kAJY) if issues persist after 24 hours
This domain is already connected to another Directify directory. If you own this domain and need to transfer it, contact support.
Many DNS providers don't support CNAME on root domains. **The easiest solution is to use the Nameservers method** (Option 1). See [Root Domain Limitations](#root-domain-apex-cname-limitations) for more details.
***
## Removing a Custom Domain
1. Go to **Directory Settings** → **Custom Domain**
2. Click **Remove Domain**
3. Confirm the removal
Your directory will revert to using the default Directify subdomain. You can optionally revert your nameservers or remove the DNS records from your domain registrar.
***
## Advanced Configuration
### WWW and Non-WWW Handling
Directify automatically handles both `www.yourdomain.com` and `yourdomain.com`. No matter which version a visitor uses, they'll reach your directory. We recommend:
* **Using Nameservers (Option 1):** Both versions work automatically
* **Using CNAME (Option 2):** Add both the root and `www` CNAME records
### Multiple domains
Currently, each directory supports one custom domain. If you need multiple domains pointing to the same directory, set up redirects at the DNS level to your primary custom domain.
***
## Root Domain (Apex) CNAME Limitations
Some DNS providers don't support CNAME records on root/apex domains (e.g., `yourdomain.com` without any subdomain). This is a technical limitation of the DNS specification, not a Directify limitation.
**Recommended Solution:** Use the **Nameservers method** (Option 1) to avoid this issue entirely. Point your nameservers to `ns1.directify.app` and `ns2.directify.app`, and we handle everything automatically.
### How to check if your provider supports it
Try adding a CNAME record with `@` as the name. If your provider shows an error like "CNAME not allowed on root domain" or "Cannot add CNAME to apex", you'll need to use one of the workarounds below.
### Providers that support root domain CNAME
These providers support CNAME flattening, ANAME, or ALIAS records on root domains:
* **Cloudflare** (free) - Automatic CNAME flattening
* **AWS Route 53** - ALIAS records
* **DNSimple** - ALIAS records
* **DNS Made Easy** - ANAME records
* **NS1** - ALIAS records
* **Netlify DNS** - Automatic handling
* **Vercel DNS** - Automatic handling
### Providers that don't support root domain CNAME
* GoDaddy (basic DNS)
* Namecheap (basic DNS)
* Some traditional registrar DNS services
### Workarounds
The simplest solution. Change your nameservers to Directify's:
| Nameserver |
| ------------------- |
| `ns1.directify.app` |
| `ns2.directify.app` |
We'll handle all DNS configuration automatically, including the root domain issue.
Instead of `yourdomain.com`, use `www.yourdomain.com`:
1. Set up `www.yourdomain.com` as your custom domain in Directify
2. Set up a redirect from your root domain to the www subdomain
**Using your registrar's forwarding feature:**
Most registrars offer URL forwarding. Set up a redirect from `yourdomain.com` to `www.yourdomain.com`.
Cloudflare offers free DNS hosting with automatic CNAME flattening:
1. Create a free account at [cloudflare.com](https://cloudflare.com)
2. Add your domain to Cloudflare
3. Update your domain's nameservers to Cloudflare's (provided during setup)
4. Add your CNAME records in Cloudflare's dashboard
You don't need to transfer your domain - just point the nameservers to Cloudflare. Your domain registration stays with your current registrar.
Some providers offer ALIAS or ANAME records as alternatives to CNAME for root domains. Check your DNS provider's documentation for:
* "ALIAS record"
* "ANAME record"
* "Flattened CNAME"
* "Virtual CNAME"
If available, use the same target (`custom.directify.app`) with an ALIAS/ANAME record type.
***
## Need Help?
Join our Discord for quick support
Email us at [sergey@directify.app](mailto:sergey@directify.app)
***
Learn about free subdomain configuration
Customize your directory design and branding